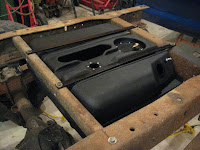
Welp, it came down to the second of the most daunting tasks of the whole project…The gas tank! The tank of course is another simple thing you might be thinking, but in all reality, there are a few notable items you must keep in mind:
The filler neck must be on side and must line up, or be capable of lining up to a fuel filler door
The sending unit must be compatible with a Ford 73 Ohm empty, 10 Ohm full gauge
There has to be a vent, or a vented gas cap as there is no feedback system
It has to be a realistic capacity
It has to be located in a safe location
I had heard of people using different tanks from various vehicles to make this happen in Highboy trucks. One of the most popular ones was a tank specifically from a 1984 Bronco II. Apparently, these tanks were narrow enough to fit in the frame rails, had a 15 gallon approx capacity, and the fuel pickup unit and sender unit for that exact year are pre-fuel injection and works with the stock fuel pump and fuel gauge.
The problem with them, and why I didn’t go with them- is that they are flat-out UGLY. I like a clean look in whatever I do… Not so much clean as in shiny paint and the sorts, but clean in that I like modifications and fabrications that look factory looking as if it was designed for the application originally and an unknowledgeable person would never be the wiser.
The ’84 tank did NOT fit into this category. They are nearly cube shaped, hang WAY down, sit off to the side, and just don’t sit right. Short of spending $350+ to have a custom tank made (and trust me, I will when I tear the truck apart for full restoration) I needed a better solution.
It was costly, $255 to be exact, but it had a LOT of bonuses going for it. The dimensions listed showed it would fit between the frame rails with 3 inches to spare, it had decent fuel capacity (actually, same as stock tank that was behind the seat in the cab), it had the filler neck in the right location AND the filler neck was 2 ¼ inches which is the same size as the fuel filler neck, it took a standard 5 bolt fuel sender unit, and it was shallow enough that it looks like it was made to fit. Heck, it even came with tank straps!
After receiving it in the mail last week and opening it up, I was thoroughly impressed. RARELY am I impressed with products these days as nothing appears to be made with the intention of lasting a lifetime. I kind of in the back of my mind expected something thin, flimsy, crappy hardware, cheap straps, etc. What I got was a tank that must’ve been ¼ inch thick, I could stand on it if I wanted to, hardware was all cadmium plated, O-Rings for everything, superb quality rubber gaskets, and best of all- MADE IN THE USA! Worth every penny.

Then came the fuel filler hose. Well, Napa only carries hose for 2” diameter. Both the fuel neck in the truck and the filler housing on the tank are 2 ¼, and here is where I cheapened out. Rather than spend $80 dollars on 3 feet of the right fuel filler hose and wait for it to be ordered, I spent $40 on 2” hose that they had in stock and used little seconds of the original filler hose and hose clamps to adapt it up to size. I can go back later and fix that when I have the cash.


1 comment:
We offer services like Nipple Restoration and many others. Nouvelle Aesthetics supports UK Cancer Charities through its medical micro-pigmentation work. For more information visit: - www.nouvelleaesthetics.co.uk
Post a Comment